The Group Policy (GP) is the center of change and configuration features in Windows operating system. Also, You can specify settings for both users and computers inside your network. Settings include registry-based policies, security, script, and software installation.
Group Policy affects groups of users or computers. Hence it is called Group Policy. You simply make a policy and link the policy to an OU (Organizational Unit). Also, you link a policy to the domain. When you link a policy to the domain, it applies the policy settings on all computers and users in the entire domain.
Furthermore, if you don’t want the policy affect a specific user or computer, you can do that.
Consequently, policy affects users when they log on to the domain. It affects computers when they start. Of course, when computers are started, and users are working, group policy can affect them. Users just open the Command Prompt and run the “gpupdate” command. The policy would be applied to them.
Topics covered in this article
Group policy Advantages
Group Policy Management Console
Create Group Policy Object (GPO)
Link GPO to an OU
Group Policy Management Editor
Computer Settings
User Settings
Edit GPO
Group Policy Advantages
Control User Experience: It seems like you can make any kind of changes on desktop computers. For example you can lock the Taskbar, Control Panel, etc. Nobody can open the Control Panel or unlock the Taskbar. No one can escape the policy except the people you specify.
Configure Security: You specify how people should choose passwords for themselves. How many characters the password should have. In addition, you force users to change there password after an specific period of time and many more security settings.
Configure System: Administrator force the computers to use the printer they want. You specify which radius server they can use and many more system configurations.
Install Software: Administrator easily can install software through group policy.
Run Script: Administrator can write an script and apply the script on users and computers. For example administrator makes an script to restart computers at specific time.
Group Policy Management Console (GPMC)
GPMC is Microsoft Management Console (MMC) snap-in. GPMC is an scriptbale MMC snap-in. It provides a tool for centralized Group Policy in the network. In addition, it is the standard tool that Microsoft recommends to administrators.
Group Pollicy Management Console
While opened, expand Forest>Domains. Almost you see all the domain components. You can only see the OUs, not the users and computers that are inside the OU. For example, you see the OU itself not the users inside the OU.
In the left pane of GPM Console, you see Group Policy Objects. If you click on, all policies are visible there.
Create GPO
Group Policy Object (GPO) is collection of settings. In addition it defines how computers look and how they behave for specific group of users and computers. For example you define a group to have a special background image. You apply the policy, as a result of applying policy, the image will be applied on their desktops. It is not a matter which desktop a user logs on from. It means from every desktop computer they log in, the image will be applied on the background.
1. For creating a GPO, First of all, right-click on Group Policy Objects on the left pane. Select New option. A window pops up.
Create New GPO
2. Type a name for the GPO you are creating. While finished click on OKbutton to close the window.
New GPO Name
in the window, you can see the GPO you just created.
Link GPO to an OU
While done with creating new GPO, it is the time to link the GPO to an OU. If you don’t link it to an OU or the entire domain, it won’t work.
1. Right-click on an OU. Select Link an Existing GPO. It means you want to link this OU to a group policy object.
Link GPO to OU
2. Select the group policy that you want to apply on the OU. While selected, click on OK button.
Select GPO
Group Policy Management Editor (GP Editor)
Group Policy Management Editor is a tool that helps administrators to manage policy settings. When you do settings using GP Editor, settings are stored in GPO to be applied on computers and users.
GP Editor has two different kinds of settings for computers and users. Computer Configuration is affecting computers and User Configuration affects users.
Group Policy Management Editor
When administrators create a GP object, they add some settings to that. So, for editing GP object, right-click on the GP object and select Edit.
Edit GPO
The new window which opens is GP Editor. Do the settings whether for computers or users. While done, close the window. If GP object is not linked to an OU, link it. If already linked, it applies to users and computers from 90 minutes to 120 minutes. If you are in hurry, just tell your clients to update the policy running the GP update command line on their Command Prompts.
GP Editor
Conclusion
Finally, you learned a few things about GP which will be really needed for our further lessons. For any kind of question, feel free and leave a comment..........
Install Active Directory Domain Services on Windows Server 2016
The Active Directory Domain Services is the feature of creating domain and managing it, but it’s never had been easy to do in a new platform due to many changes or having no experience of it. Surely you need some steps to follow to install and configure Active Directory Domain Services(ADDS) fully by following up the steps here. No matter if you have installed your server now or if you are doing it on a VM machine or Hyper-V you can do it now, so let’s get started.
Install Active Directory Domain Services (AD DS)
To get started, first you have to install it then setup a domain controller.
Before starting, make sure that you have renamed the server properly and have given static IP address to it. If you don’t know how to do it then see the instructions below.
To setup static IP address open Run (Windows + r) type Ncpa.cpl and hit enter, when the Network Connections opened select the network and right click on it choose Properties. Now selectInternet Protocol Version 4 (TCP/IPV4) and click on Properties.
When the window appears, select Use the following IPaddress then enter an IP address, Subnet mask, Preferred DNS server addresses and click ok.
Enter IP Address
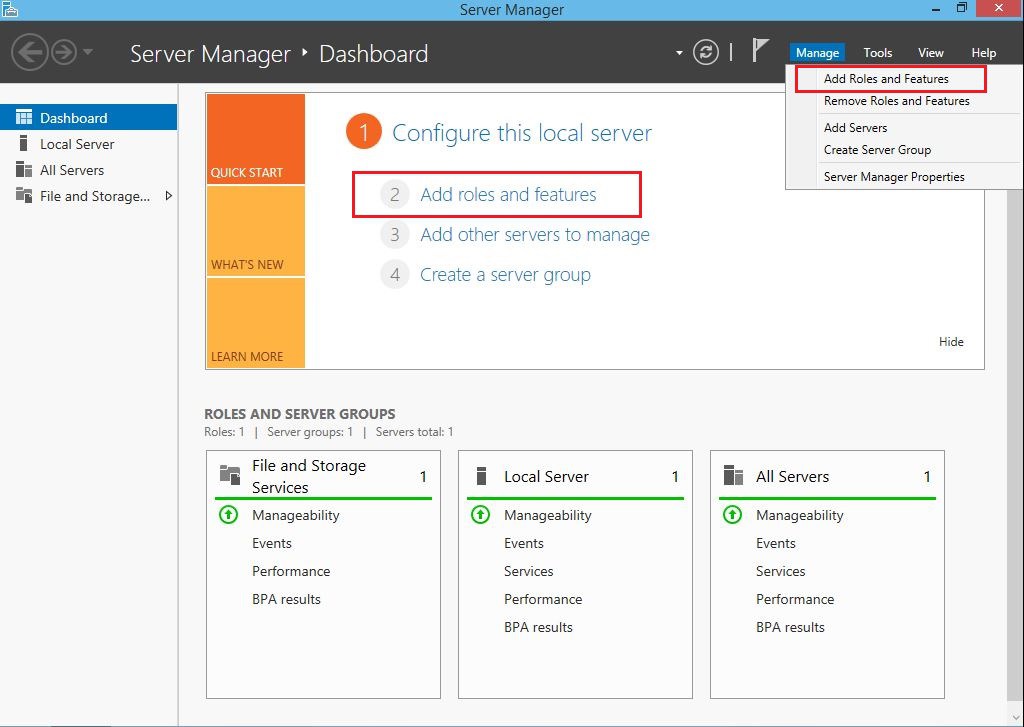
01. Now to install AD DSopen Server Manager and click on Add Roles and features.
Server-Manager
02. Read the important notes and clickNextto verify and continue the installation.
Add-Roles-and-Features-Wizard 1
03. Herelet the Role-based be selected, just click Next.
Active-Directory-Installation-Type
04. Select the server you want to install AD on it then click Next.
Active-Directory-Destination-Server
05. Now select Active Directory Domain Services then click Add Features to include the required features within AD and click Next.
Active-Directory-Server-Roles
06. Leave the features window by default and click Next.
Windows-Server-2012-R2-Features
07. Read all the info about the AD and click Next.
AD-DS-Information
08. Now the ADDS is ready to install, click Install to begin the installation.
Confirm-Installation-of-AD-DS
09. Wait for the installation to complete, then click on Promote this server to a domain controller.
Promote-this-server-to-a-domain-controller
10. Configure Server to Domain Controller
1. When the window opened click on Promote this server to a domain controller, now click on Add a new forest then type the domain name in the Root domain name blank and click Next.
Active-Directory-Deployment-Configuration
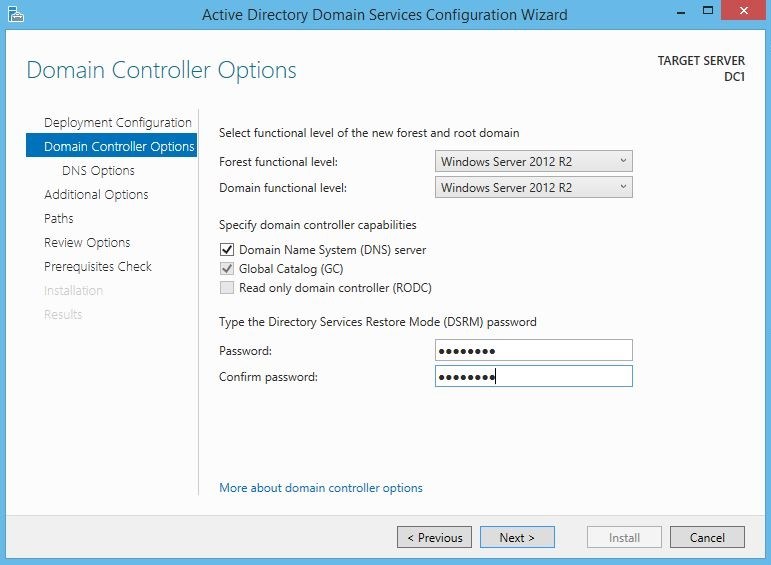
2. Let the Domain Controller options be by default and type a password for DSRM then click Next.
Domain-Controller-Options Notice: Set the Forest functional level the highest so your environment can support and make sure that all the domain controller are supported with that operating system.
3. Ignore the DNS delegation warning because its due to not installed DNS server on the server, and click Next.
DNS-Options
4. Now verify the NetBIOS name and change it if necessary then click Next.
Additional-Options Note: NetBIOS name is a Network Basic Input/output system that allow applications on separate computers to communicate over a local network and can be required by some applications and network devices.
5. Specify the location of AD DS database, log files, SYSVOL and change it if necessary then click Next.
Active-Directory-Installation-Paths
6. Now review all the configuration you’ve done then click Next.
Active-Directory-Review-Options
7. The configuration is done now, click Install to begin the installation and ignore the warnings.
Note: It will install DNS role too
Prerequisites-Check
After installing the system will reboot automatically, when the system restarted the domain will work successfully and you can log in and see the domain features.
Installed-Server-Roles
That’s all. If you have any question regarding this feel free to ask me.
Prepare the installation media (DVD, USB flash, etc) and start the installation process. If you don’t have the Windows Server 2016 installation software, click here and download the software from Microsoft website. 01. Plug the Windows Server 2016 boot drive (DVD or USB ) to the computer and boot your computer. When the Windows setup page appear, select your language, time and currency format , keyboard then click on Next .
02. Now click on Install now button to start the installation process.
03. Select the appropriate version of the Windows server then click Next. Make sure that you've chosen an appropriate edition of Windows server.
04. Put a check mark in the box next to the I accept license terms and click on the Next button.
05. Select the Custom: Install Windows only (advanced) option for clean installation. When you upgrade a Windows server you can have your settings,apps,etc from previous version of Windows.
06. Select the hard drive that you want to install the windows server. Then click on the New button to create the partitions.
07. After clicking on the New button, some option appear. Specify the amount of the drive based on MB and click on Apply button. Then click on Ok button, if you want add more drives do this process again. When finish click on Next.
08. After clicking Next the System starts coping all the files from the external drive to internal
hard drive. It will take some minuets then system will be restarted several times.
09. When the system copied all the files and restarted, finalize your task by entering the required details. Type complex password E.g."Abc@123" type again reenter password box and click on the Finish button.
10. Press Ctrl+Alt+Del buttons to jump start the screen to login page and inside the box below the administrator user name, enter the password and press Enter button from the keyboard to sign in the Windows.
11. After you logged in the Windows you see the some thing like the picture below.
Welcome to Windows Server 2016 R2
Conclusion
Finally we have installed the Windows Server 2016 successfully and is ready to work.